This is a guide to making your own ultralight tent stove out of cheaply available materials using simple hand tools. The stove is intended to take up practically zero space in your pack and weigh as little as possible (250-300 grams total – about half a pound) cost less than $50 and take maybe an hour of your time.
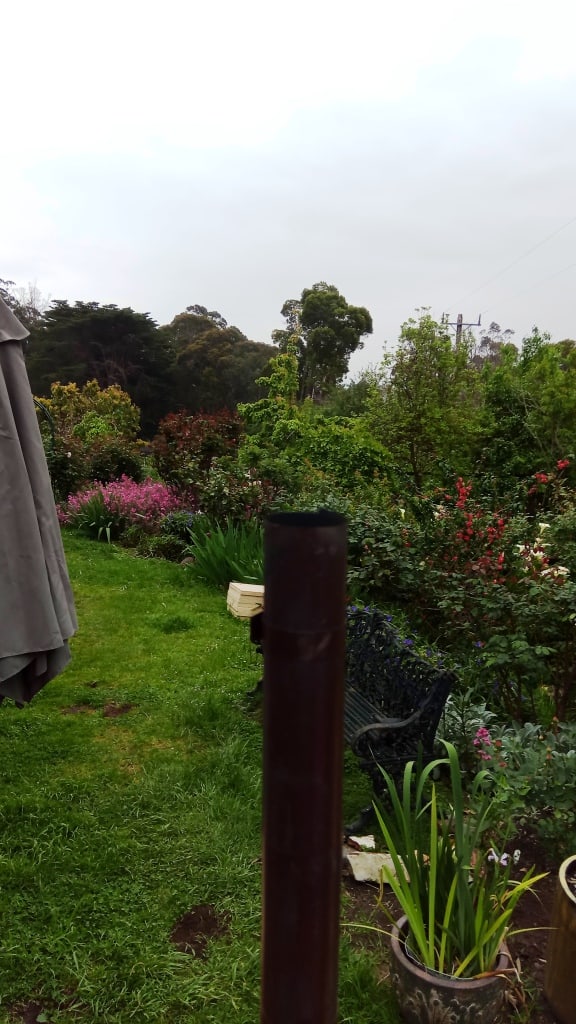
It will provide you with an amazing warm stove that will provide enough heat for even a snowy winter tent and which utilises readily available forest waste for heat and cooking. It is a ‘work in progress’, so there will be updates. The stove (body) in the photo above is only 6″ in diameter and 4″ high (15 x 10 cm).
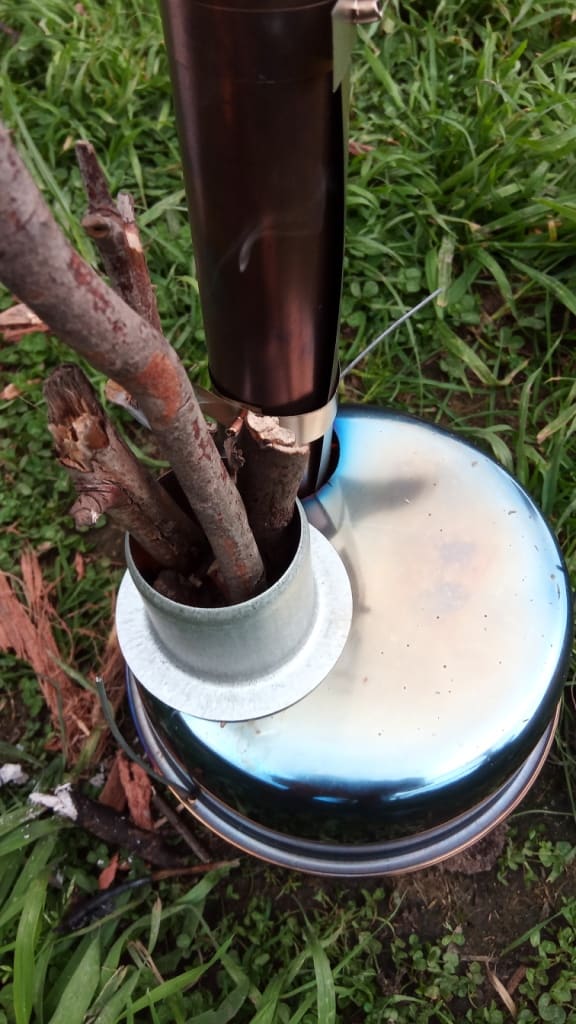
(Updated again and again!) I took a break from tree planting this morning to have a play with this prototype stove (and to try out my chimney). I have made this one out of two (6″ dia 2′ high – 15 x 5 cm) stainless steel bird feeding bowls from the local $2 store. They weighed 78 grams each.
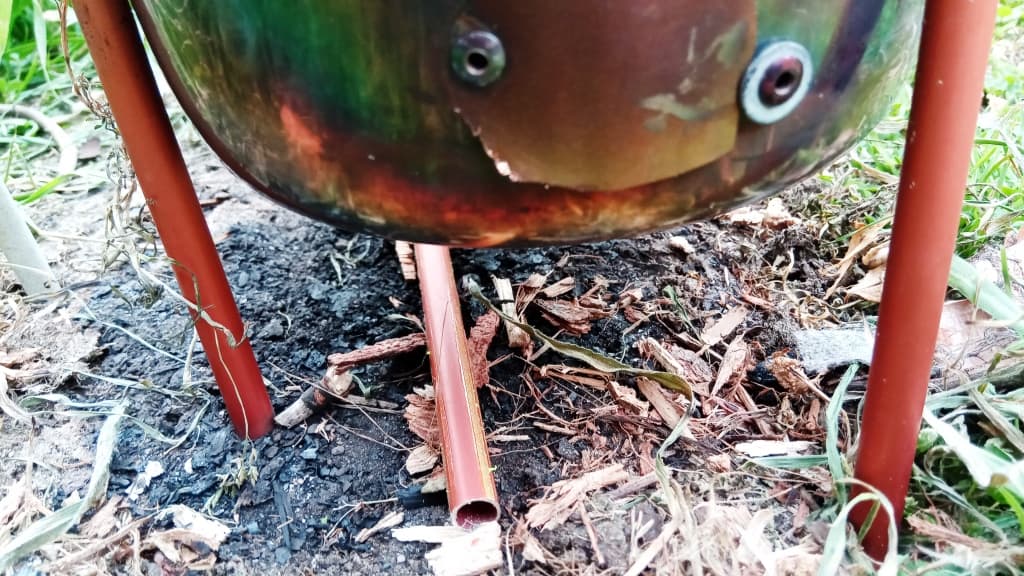
I have joined them together with the simple expedient of drilling three holes around the rims and pushing a piece of wire through the holes and into the ground. Tent pegs would work better and would secure the stove very safely in the vestibule of the tent. The collar thing I am using for a fuel guide tube is just a $2 plumbing fitting from Bunnings. I will (have) come up with something better/lighter.
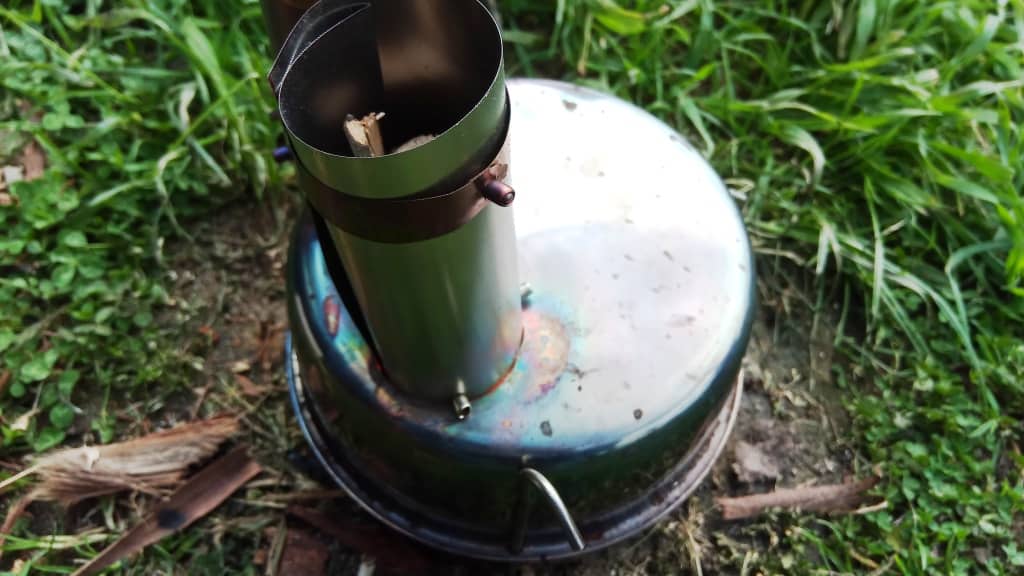
The chimney is just sitting in the hole I drilled with the 40 mm Lenox hole saw at the moment. The twigs you see in it are 1/2″ to 3/4″ (12-19 mm). These are easily broken over your knee and can be split (carefully by pushing a fixed blade knife through them to get at the dry heartwood. NB the posts How to Light A Fire In the Wet and Carry a Knife

You can start the fire with some kindling in the bottom with the lid swung back secured by only one peg (NB Now using a lighting hole). Once it is going you can swing the lid over, put the other two pegs in place and attach the chimney.
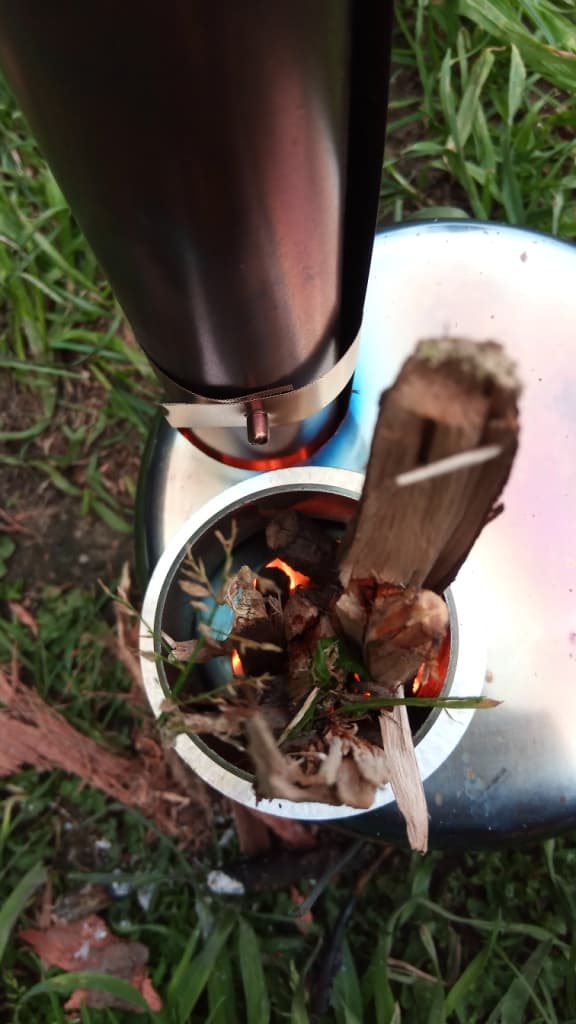
After a little while a very hot fire results which is easy to keep going and which puts out lots of useful heat. This would keep a small tent quite cosy and provide enough space to boil a small billy.
I do need a flame diverter so that the flame does not simply rush out the chimney as it is doing here. This will be just a piece of .1mm stainless steel foil cut to shape and bent at 90 degrees. The bottom half will conform to the floor and that half of the base and will keep it in place.
The sides will conform to the inner wall shapes of the two bowls and the top to the ‘roof’. I can make a pattern out of paper to help with the design then when I need a new one it will be easy to make another.
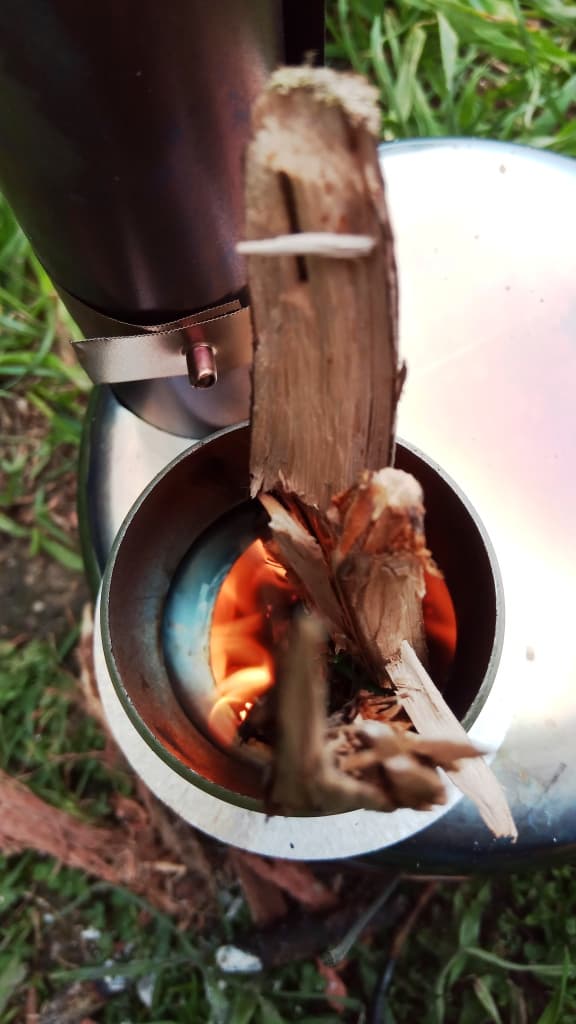
At the bottom end furthest away from the fire and the chimney there will be a gap (the same area as the chimney) which will force air to go all around the corner formed, making the stove burn all the wood gas generated before it exits up the chimney.
I also need a shallow cup shaped container such as the end of a beans can to keep the hot coals centred below the fuel feed tube for maximum combustion efficiency. There will be an update.
Update 1:
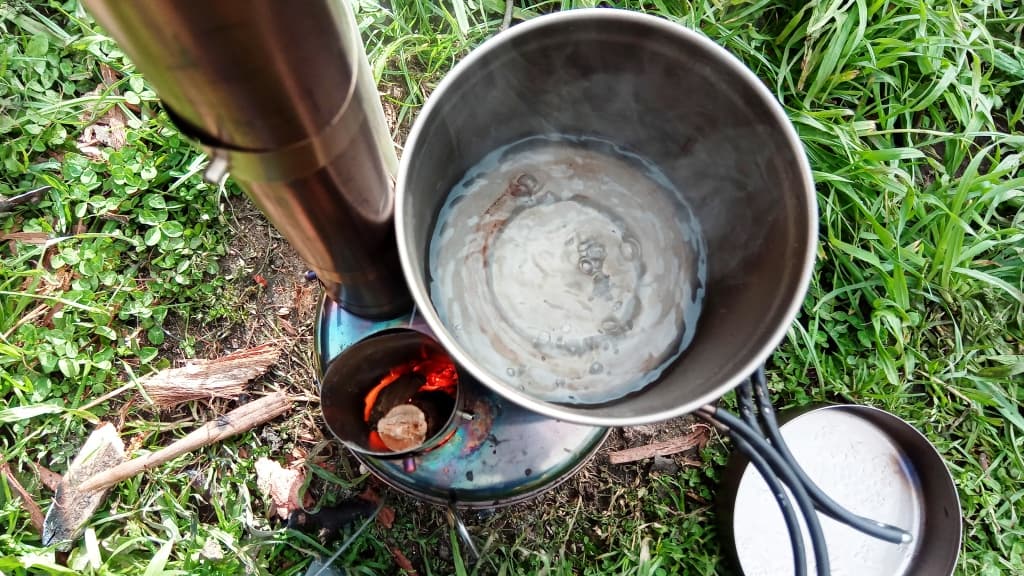
I made a flame guide (as described above) and found a stainless steel Vacola lid as a ‘container’ for the embers at the bottom of the sticks. These two changes really improved the performance of the stove. It is burning much hotter and the flame is going to the right, around the flame guide then back along the other side of the stove before exiting the chimney. I will take a photo of the guide when it cools down so you can see what I mean. I need to make a better one though as this one ‘leaks’ a bit.

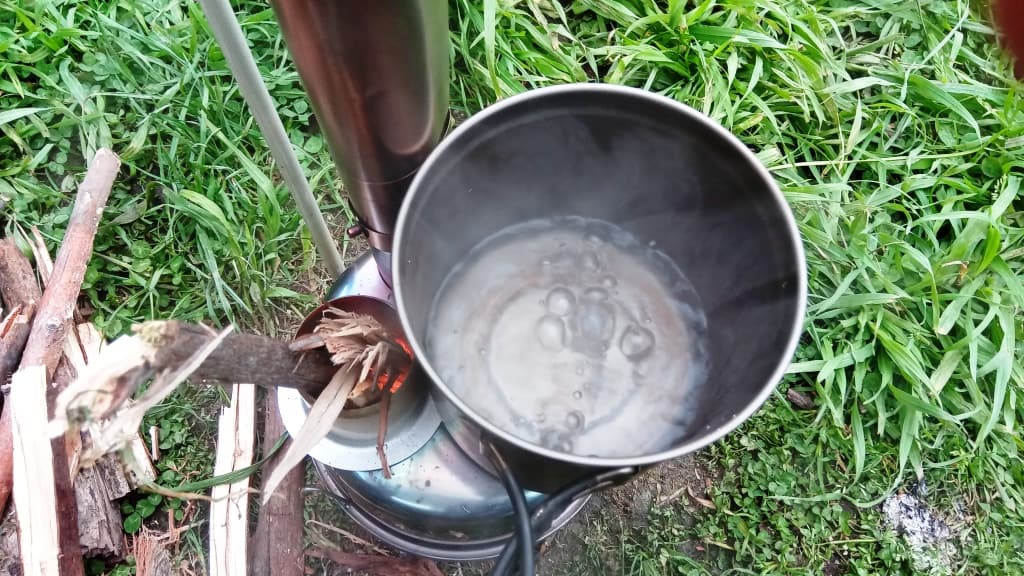
It brought a cup of water to the boil in around five minutes.
The stove was actually smoking more than usual when I took this shot – burns pretty clean doesn’t it?
Here is a video of the stove working. It has a very nice ‘roaring’ sound – hard to hear over the noise of Della’s doves I know!
Time for a nice cuppa!
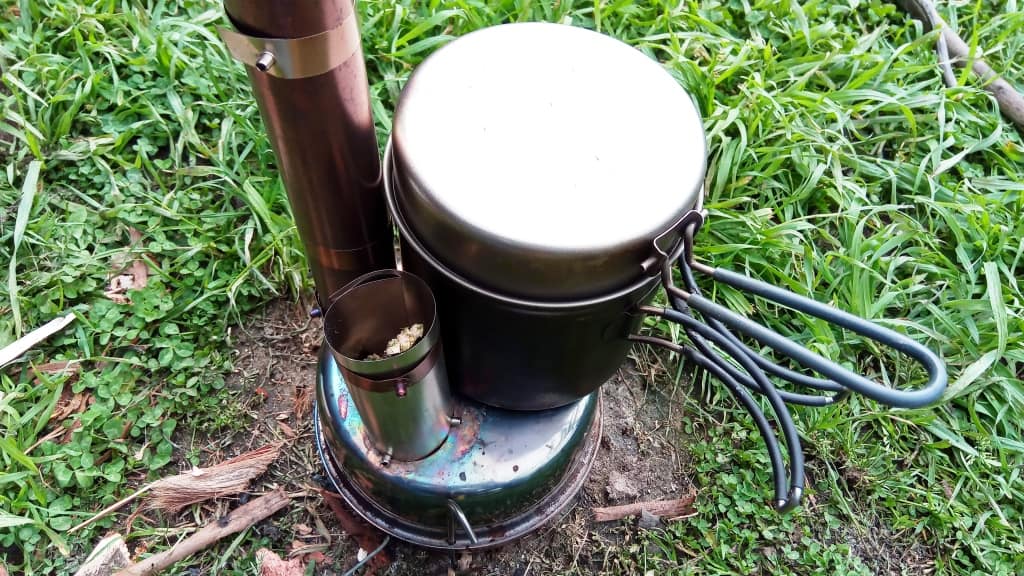
I have now also worked out how to make a fuel feed tube and I have decided to make another top lid with a 35mm outlet so that I can downsize the chimney so it will fit in my pot.
It was quite cold late this afternoon and this little stove was really keeping me warm playing around with it.
The two bowls fit inside each other and my billy will sit inside them. When I make the chimney 35 mm (the two holes in this prototype are both 40mm) then the chimney when rolled up will be less than 5″ high meaning it will fit in my billy.
The whole thing (stove plus bits) will just add about half an inch in height and 1/2 an inch in outer diameter (at the bottom) to my existing cook set. When I make the whole thing out of titanium (wait for it) I imagine the whole set-up will weigh less than 200 grams but will provide all my cooking and heating/clothes drying needs.
As I have mentioned before I do intend to create a TEG or Peltier device to go with it to generate enough electricity to recharge all my electronic devices (yes, even when the sun is not shining!) I am hopeful I can create such a device for less than 150 grams weight.
On of the nicest things about the stove is that there was absolutely no sparks, flame or smoke outside the stove. It will not burn the tent down or set fire to the forest – though I will have to devise a spacer to keep the chimney from actually touching the tent fabric -mind you it was cool enough you could clasp it in your hand (briefly) so I doubt it would be a problem anyway, but better to be safe than sorry. It was also exceedingly quiet. It is just wide enough to perch my billy on.
If it is sat on something (eg a piece of bark) it will not singe the grass even. Much moreso than a gas stove (than which it is lighter) it is extremely LNT – if you care about such things. The small amount of cold ash produced can be used to carefully fertilise some precious native plant. (PS I have since made legs).
I had intended at the outset to just make a lid for my DIY 33 Gram Roll Up SS Hobo Stove to which I would attach the chimney. This would be lighter, and I will no doubt revisit this idea too some time, especially if the electricity generation idea works.
PS: Let me say that this stove is not my invention. That piece of genius goes to the incomparable Tim Tinker. This is just my own version of one of his excellent stoves (the KISS ie ‘Keep it simple stupid’ stove). I have just adapted it to materials at hand and constructed it using simple hand tools which the hobbyist might be able to utilise to make one themselves. I recommend it.
I thought I knew how fire worked but once I made this tiny stove I realised that I had been entirely ignorant. I am astonished how it works and how brilliantly it works.
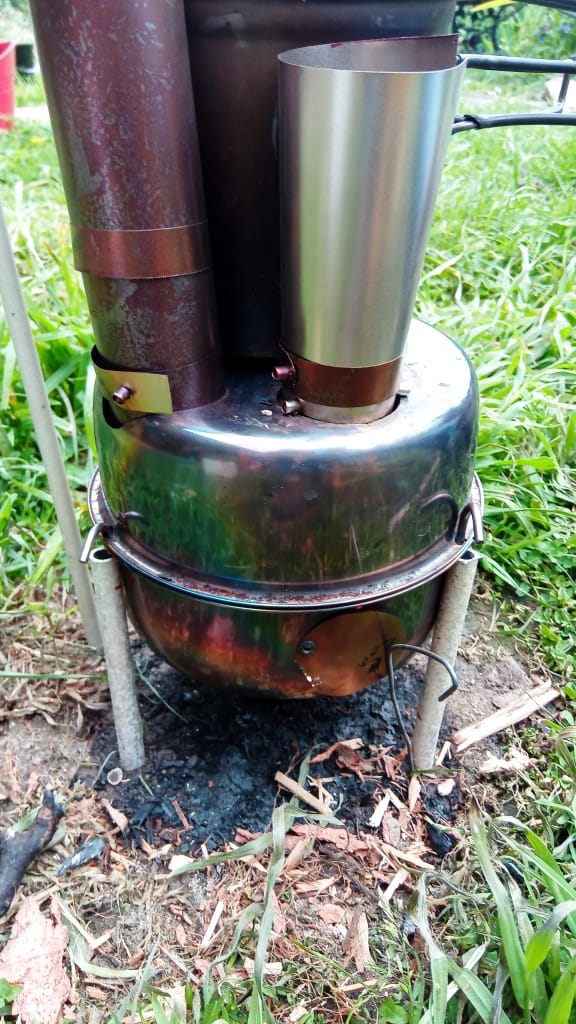
Update 2: Today I made a number of changes . I made a short section of ‘chimney (5 1/4″ so it will fit rolled up inside my pot. Notice how I have trimmed the band? Should have done this before I pop-riveted them. It has three pop rivets to prevent it from falling inside. These are stainless steel pop rivets otherwise they would melt. Be warned. 1 1/2″ sticks inside to balance the length of firewood outside so it does not fall over. It seems to work very well and helps the wood feed into the fire. A slightly different length might work even better – likewise diameter.
I also improved the flame guide (old one shown below) by adding 1/2″ ‘flaps’ to the bottom and sides to prevent air from getting around it and to help it stay in position better. I also bent up a piece of the bottom to prevent the Vacola lid from shifting (as shown in the photo that it did). It is supposed to contain the hot embers which is what keeps the fire going.

I also added a 3/4″ hole at the bottom of the fuel feed tube to facilitate lighting the stove from the outside. This works brilliantly. You should see the lighter flame being sucked in to the kindling. The stove is roaring in a twinkling. I will add another pop rivet with two small washers underneath to act as a catch for the door of this lighter hole. Oh, I also added a pop rivet (now two) to the side of the stove underneath the chimney to prevent it falling any more than a set distance inside the stove.
I also outsized the holes which join the two bird bowls together so i could use some tent stakes. ideally I would drive these down into the ground which would prevent the stove from tipping.
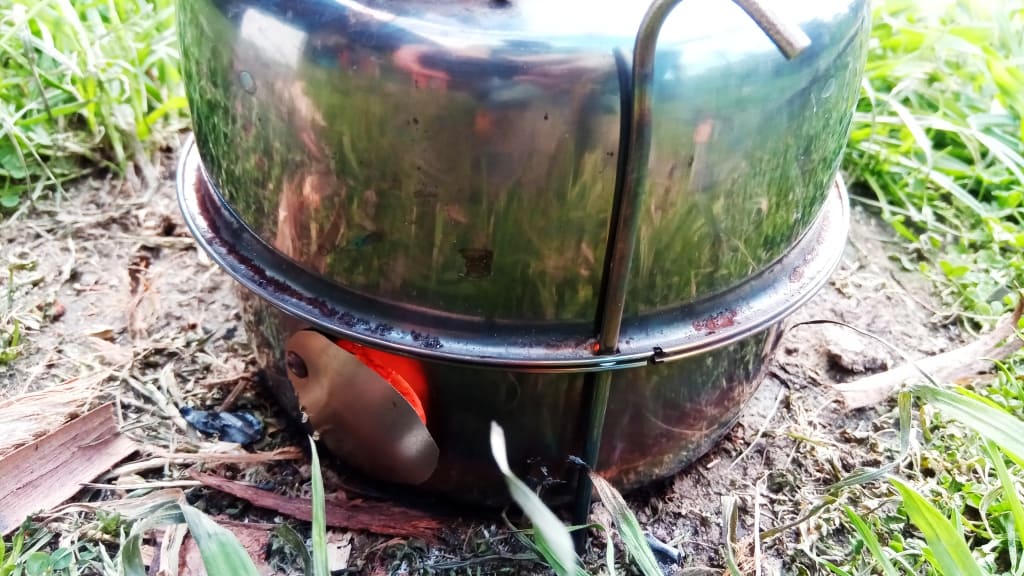
I have now improved that lighting door closure. I realise I didn’t have the tent pegs driven in tightly enough to prevent an air leak between the two halves of the stove. I found some aluminium tubing to act as legs to get the tent off the ground. 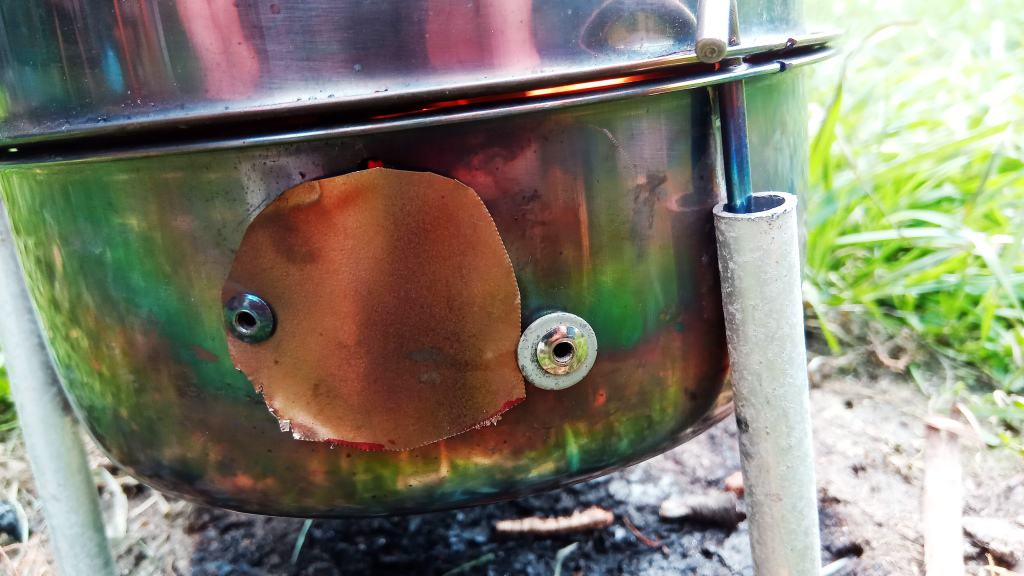
Found an Easton arrow shaft I could cut down. As you can see these are much lighter. I got enough for four from one shaft. I will use the one lying on the ground as a ‘blower’ (and a spare. You would not believe how much easier it is to light the fire (easy enough anyway) when you can blow a stream of air into it through the lighter hole. It simply instantly turns it into a furnace!
I am even more unbelievably impressed by this stove now. I hope I have added enough details so you can make one of your own. Next step is to try it out in one of my tents, but tomorrow I have more tree planting plus some other jobs including some sheep husbandry.
I will post weights when I have finished. I have yet to order and obtain the two different sized hole saws I need and the swages to make the lighter chimney bands. Of course in the fullness of time I will also try to make the whole thing out of titanium. I am expecting that in titanium the whole set-up will only weigh perhaps 200 grams, maybe even less.
The billy now fits on the surface better and has more contact with the top of the stove. There is enough room to make the fuel feed tube a little wider or to move it closer to the edge of the stove – I will think about both options in the next model.
As you can see it is burning very hot inside and the flame is all swishing away to the right where it will go around the flame guide before coming all the way back across the top and exiting the chimney. That cuppa is coming along nicely isn’t it? That is the Toaks 1100 ml billy featured in the post Cookset Solutions. I will have to reprise that post now (at least for winter camping).
BTW: As the fire is completely contained I believe this stove is safer than a ‘normal’ gas or alcohol stove (yet no fuel has to be carried). Therefore I feel that it should be able to be used where fires are prohibited (I would), and that it is inherently more LNT than any other method of cooking.
I have a couple of other things I want to try. If I buy a size 35 and 54 hole saw (ordered) I will be able to make the chimney slightly smaller (so that rolled up it will fit in my Toaks billy) and the fuel tube larger (so that it will contain more wood and make fueling less frequent).
I am also conscious that the stove loses a lot of heat to the ground when I really only want to heat the air in the tent. I will try to devise some ‘legs’ to lift it. I may acquire some slim ceramic tubes which I can slip over the tent stakes. (Trying simple aluminium tubing legs – above. Seem to work. Thought they might melt but no problems yet. I will probably cut down an aluminum arrow shaft. It would be lighter – done)
I am also wondering about the flame diverter: what the optimal size and placement of the hole in it should be (the same size or smaller than the chimney for example). I am also wondering whether multiple holes in it would create greater turbulence and more complete combustion. I wonder whether some additional air flow into the secondary combustion chamber would produce more complete combustion and more heat.
I have now increased the size of the hole in the diverter to the same size as the chimney. This has improved draught. The hole is still at the bottom though. May be better half way up or at the top. More experimentation needed.
I realise that the chimney can be allowed to rest on the bottom of the stove and have one cut-out side which can be rotated to act as a damper. At the moment I have it resting on these two long pop rivets higher up then the single one I had it resting on before. This has improved the stove’s performance.
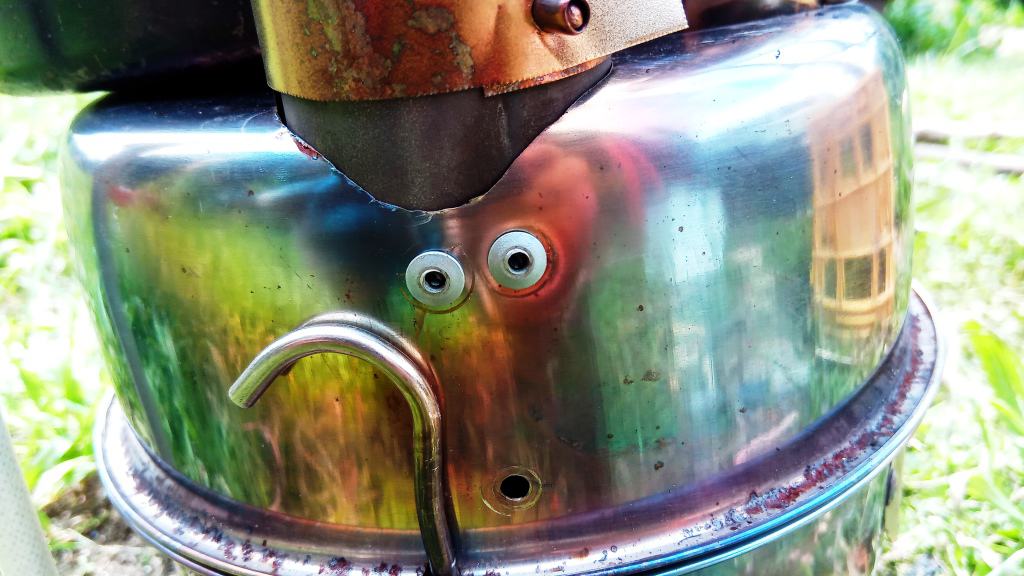
BTW: The above photo is my daughter’s favourite from this post – I did not recognise the pot-face but she did!
I am also going to be building an ultralight wood splitter. A solid fixed-blade knife is better and safer than a hatchet for splitting such small wood as this. I realise that if I use the stove as much as I am likely to in winter I will be splitting quite a bit of wood, so it might as well be easy.
At the moment I have in mind a tool something like an (ultralight) spoke shave whose handles might be a couple of lengths of stick. I envision something under one ounce.
I am thinking an approx 2″ section of lawn mower blade might be a useful material to begin with. If I weld a short length of rectangular hollow section to each end (1 1/2″) I can first use it to square the ends of two pieces of stick then jam them in to make the handles. Should work well and be safe.
NB: Please understand the above stove is a prototype (which I am exceedingly happy with so far), so it is a bit rough – and you see it in various stages of creation. I will make a much neater final stove later for our own use.
This is how I usually work. Some ‘lucky’ person may become the new owner of the prototype. I am enjoying ‘playing’ with it however. My daughter took this photo this afternoon. It does give some idea of the scale of the stove.

Weights: As I said earlier each half of the stove weighed 78 grams (less the cut-outs, and the chimney weighed around 200 grams, so a little over 350 grams at the moment. However I will be saving 20% on that chimney (when I narrow it to fit in my billy) so I am already close to 300 gram. This chimney is 2 metres high. The stove now sits 6″ off the ground.
For my Grey Flyer tent I will only need a maximum of 1.5 metes for the chimney so it should come down to 120 grams in SS, half that in titanium The chimney weight can be halved in Titanium. I already have a similarly sized titanium pot which weighs under 100 grams (with lid) so I estimate that the stove can be made at around 200 grams total, certainly under 250!
PPS: As regards the tree planting mentioned in the intro, each year we plant anywhere from 50-150 trees on the farm and will continue to do so until it is a beautiful exotic forest with (indeed enhanced) grazing underneath for the sheep from the shade, tree leaves, fruit, mast etc. You can see how some of the trees so planted have been coming along in this post: The Creek. I really recommend this method of re-afforestation to you.
See Also
DIY 33 Gram Roll Up SS Hobo Stove
How to Light A Fire In the Wet
Lay Flat Kettle and Pudding Bowl Stove
Zippo hand warmer as a ‘hot water bottle
PS: Note the comment by Arlen Smith below and check out his two links: New Ideas for Cooking Under Tarps & Wood fire for inside backpackers tent.
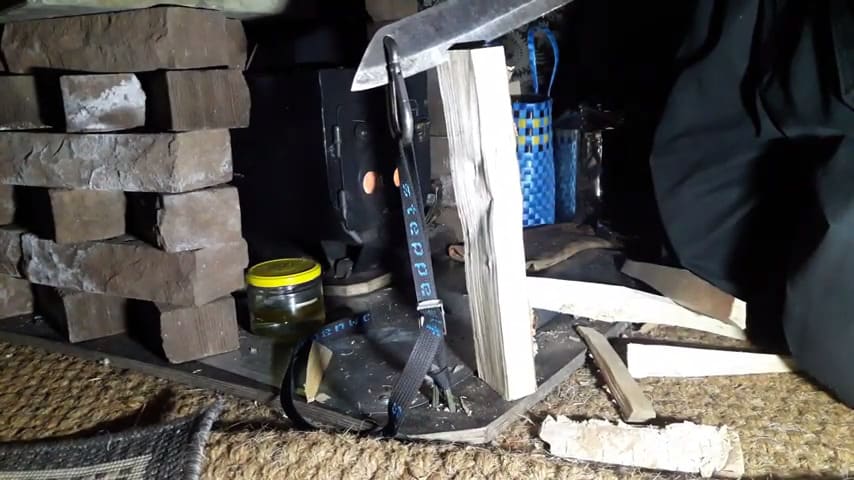
PS Huck’s Kindling Splitter (see comments). An ingenious idea:
https://www.kijiji.ca/v-view-details.html?adId=1493853018
If you want to free your cook top for cooking take a strip of tin can and make a side connector. I put the instructions of how I do it on the above internet connections. I use 1/2 a can for a simple baffle.
Thank you for your input Arlen. Good to see that there are so many other stove experimenters out there. Your designs are also commendably cheap and easy for others to try out. If they later want to make something lighter they can start playing with stainless steel foils & etc. I will add your links to my post. Cheers, Steve.
Hey mate,
Thank you for your post. Tim’s stoves, designs and his research work are amazing.
Here a link to a kindling splitter I made.
The principle can easily be used in a mobile setup: https://youtu.be/3frpuzFnQQ0
Thank you for that Huck. I have copied a snapshot of your splitter to my post. An ingenious idea. Hope you don’t mind. Cheers, Steve.
Please happily use it. I figured that even a small Mora knife with a hole for a small maillon or carabiner could do the trick on small kindling.
Thanks again Huck. Cheers, Steve.
Absolutely fascinating design of this tent stove! – Thanks for showing and sharing your findings.
Does the flame guide separate the feeder space from the chimney space within the burning chamber? And how high does it got up in the burning chamber (it doesn’t seem to have the full height as the chamber)?
Thanks very much & best greetings,
Tim
Thank you Tim. I hope you don’t mind my working with your design. The stove works brilliantly so far. The flame guide completely separates the two chambers. I am trying to make it as air-tight as possible with flaps on the sides and tops. The only place air can get through is a chimney sized hole at the opposite end to the fire and the chimney – at the bottom at the moment. I am wondering whether multiple holes or different sized holes will have a different effect. I will have to re-read your posts to look for clues to how it can be improved. I had ordered the foil months ago and it has been here for weeks. When I saw these bird feeders in the $2 store when I was looking for something else for the farm I wondered whether I could make my own chimney then make them into a stove and, as they say, the rest is history! Now I have to study up on your magic way of rolling and unrolling the chimney. So far we only rolled it up once and it has just stood outside while I played with the stove many times. I hope that the different sized hole saws and the swages will arrive in the next week or so so that I can have a go at making the bands in a different way and making the chimney and fuel tubes different sizes – so they will all fit in my billy. There will be an update. Cheers, Steve.
Thanks very much for your reply, Steve. But I am not “Tim the Tinker” – just another Tim following your blog :o)
Kind regards!
Right. Sorry My mistake. I should amend my earlier comment Cheers, Steve.
Hi Steve, Hope you are well progressed in the vaccine queue. Regarding our discussion about making my KISS stove an all-night-stove, I have posted on the subject and some of your followers may be interested:
https://timtinker.com/simple-barrel-stoves-searching-for-the-holy-grail-of-an-overnight-ultralight-tent-stove-warmer-by-experimenting-with-coffee-tins/
The addition oil of a wooden oil drizzling wick was a partial but dirty success. Possibly a little better than Shackelson & Hurley’s stove on the Antarctic sea ice where they burned two penguins every 5 min. I don’t think it is a practical solution:
https://timtinker.com/can-a-tiny-tent-stove-be-fired-with-oil/
The good news is that I have used and tested a (cheap) 33g 2L capacity soft bottle as an all-night-sleeping bag heater that is good for more than 8 hours of delightfully strong slow-release heat. Equivalent to 11.3 kg of hot rocks at 100C. It can store some of the tent stoves abundant heat as boiling water. Then it can release it slowly for all-night comfort through an ultralight reflective bubble wrap bag:
https://timtinker.com/hot-water-soft-bottle/
So far the soft bottle has survived 15 ‘uses/abuses’ and it is showing no sign of failure.
Tim (The Tinker One)
These are wonderful experiments Tim – and a great addition to the issue of warming a tent all night. The coffee can stove experiments were inspired – a pity you did not reach that ‘holy grail’ yet. The hot water bottle is an excellent idea. I would not have thought that a Playtypus type bottle would have withstood boiling water like this and would have been afraid to try. What brand of bottle did you use – and what was the source of the bubble wrap? I would like to post about this with links and credits as usual – please? I have another (sideways) idea for tent heating which I am about to try. I am about to make an (even lighter) version of my Grey Flyer tent. The lighter roof will weigh 250 grams including guys and tie outs (.93oz/yd2 material) I am soon to try some .77 oz/yd2 material (even stronger apparently) which will bring it down to 200 grams. It occurred to me that as the two flies are identical I could pitch one abut 2″ inside the other (and still retain a tautness) so that there was an air gap between them. I suspect this air gap will create an insulated area which will increase the temperature inside by 5-10C. Experiments are needed. I will post about this soon too. Cheers, Steve. PS: We have had two vaccinations so are safe to visit.Welcome any time.