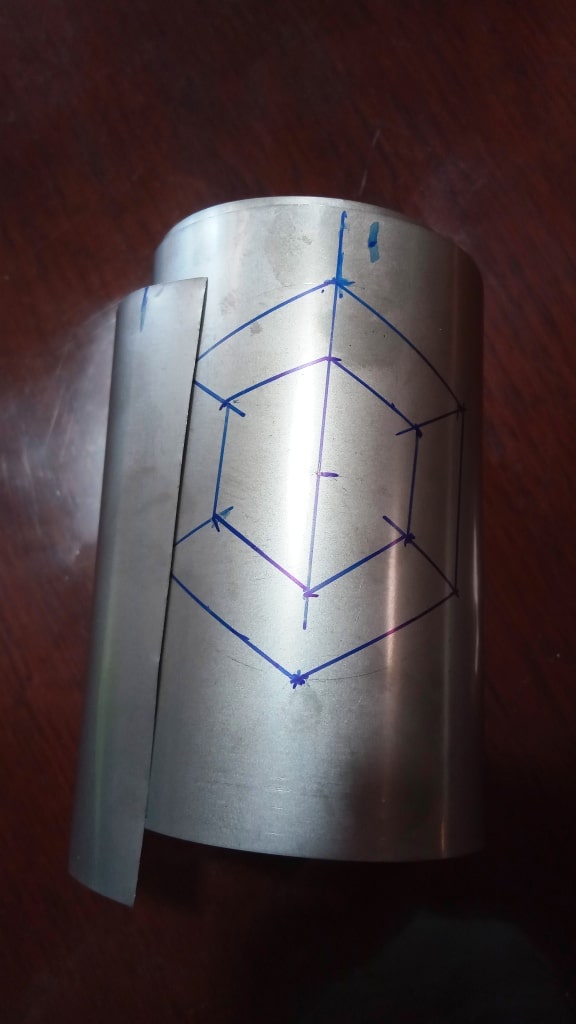
I have just completed making this titanium version of my roll-up hobo stove (as threatened here) and the carbon fibre cosy to go with it. I started with a 500 mm by 100 mm piece of titanium sourced from Aliexpress for less than US4. As stated in my earlier post You can buy the titanium foil to make the 20 gram one from Aliexpress for A$3.87 delivered. I have marked off the circle/hexagon for the fire door here. Note the ‘V’ at the bottom and top so it will roll up and fit in the billy. The circle is 2 1/2″ (62mm) in diameter. The door is 1/2″ from the bottom.
You can build it with just a pair of craft scissors, a drill and a pop riveter. I use stainless steel rivets so they will not melt. Here it is complete.
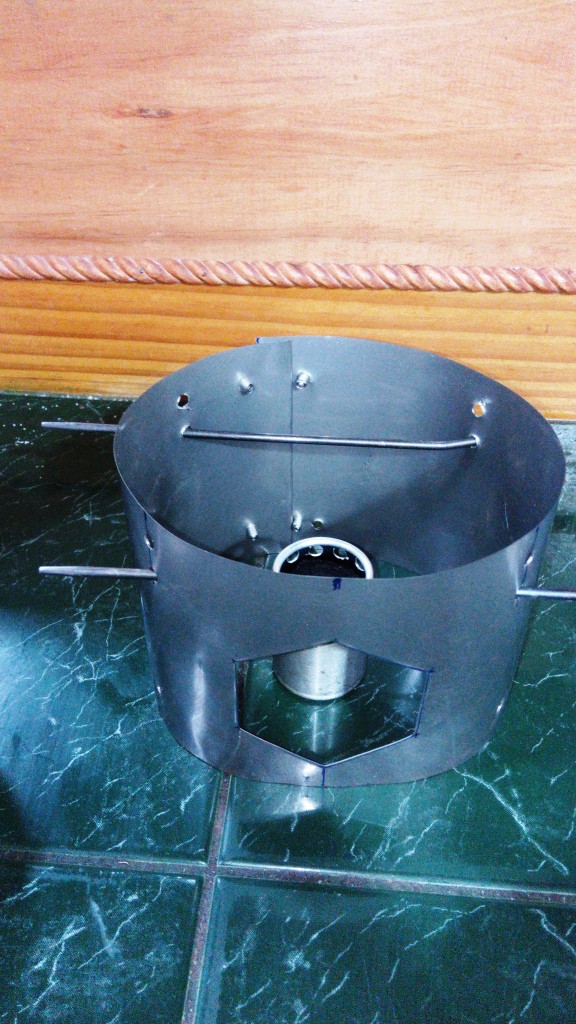
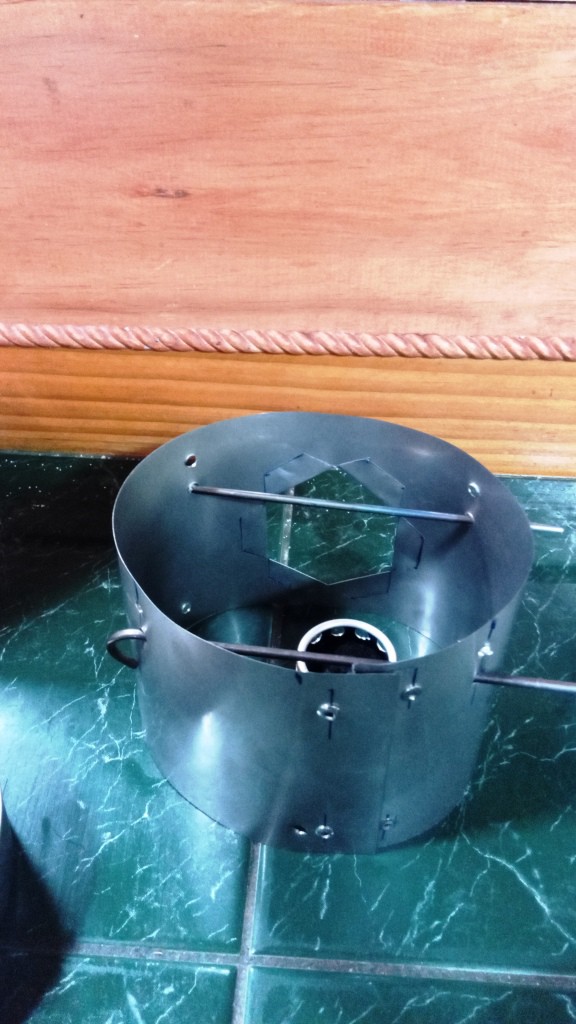
Rear view. You can study the photos and instructions at my previous post for making one yourself. It took me less than half an hour to make the stove plus cosy. They should give me several years of service.
It is 3/4″ (19mm) greater in circumference than the circumference of the pot to create a chimney. The ‘monkey’s grip’ join is 1/2″ as are the holes from the bottom for pegging it to the ground. This time I put holes at two different heights for wood fire/alcohol burning. I now think the alcohol holes could be even lower. I will try a couple more holes to see whether efficiency is improved at all.
As a wood stove it functions beautifully – and clearly there is no need to carry anything else, no fuel canisters, no heavy burners, no windscreen – just this 20 gram beauty.
Here it is in action. It boils two cups of water in about a minute with just a handful of small twigs:

PS: Some modifications: I would now position the hexagon so that it had a flat face horizontally and make the aperture of the opening just slightly smaller and higher up from the bottom, say 3/4″. This will mean that the stove is less likely to break after many uses. On the completed stove I have all the pop-rivets facing inwards. Two on one side of the opening need to face inwards. The two on the opposite side need to face outwards. This keeps the ‘monkey grip’ more secure.
Good luck with making your own. May it give you many years of warmth and enjoyment. You can make a floor for the stove out of two (roughly semicircular) pieces of foil to reduce the scorch marks on the ground – if that worries you.
I find that such small hot fires encourage a growth of small plants (such as rare native orchids) which would otherwise not arise. As I say, Nuts to Leave no Trace.
See Also:
Here is the evolution of this stove:
DIY 33 Gram Roll Up SS Hobo Stove
And here is an even more amazing ultralight DIY wood-fired tent stove:
Oooh likewise you have been busy!
I hadn’t seen that new blog update or the windscreen design. I do like the multiple flaps you’ve invented – that might work better for the 0.1mm Ti, as most single flap designs often release during use (and you can’t rejoin them with a fire going in it!). For example, I could never get Steve’s Annuri to hold (suluk46), nor other interleaving designs, as the 0.1 Ti would flex too much. I will try yours tomorrow! Thanks !!
The 0.2 mm Ti is stiffer but does roll, conversely it will spring open really well! I use a heavy rubber band to hold it rolled up.
Lixada sold a 4 panel hobo style stove made of stainless steel that had a unique flap design for assembling the 4 panels into a tube (no longer on sale) – if you send me an email I will send you a picture. I’ve used this design for the 0.2mm Ti. I don’t think it would work as well for 0.1mm as the material flexes too much, but I’ve found the 0.2mm has the right stiffness.
The real key atm is the elevated mesh floor with air holes just below it. You might want to try this in your windscreen design too – if you don’t want after then don’t include it (it’s just a circle of mesh and two bits of spike wire that can be left out). I’d love to hear your thoughts on this – I’ve found it’s better for getting a good result with wet wood typical this time of year, and probably wouldn’t need it come drier times.
Thanks Craig, I have been busy with lots of other things apart from the blog actually, lambing etc. Spring is the busiest time on the farm, and at 73 I am slower than I once was. I am also busy working on a couple of new projects, a new backpack design and a shopfront for example. You could find your way to my email address through my other blog (http://www.finnsheep.com/Steve's%20Blog.htm) but it is stevendella@finnsheep.com You can buy 1cm stainless steel weldmesh which could be just cut into a rough circle and a few sections bent downwards for legs. I did this in the parrot waterer so they would not drown it it – unnecessary as it turned out: https://www.theultralighthiker.com/2018/04/19/self-cleaning-pet-water-bowl/ It is very tough and durable and would last a long time. Cheers, Steve.
Thankyou for the excellent series. Ive made a few of these and thought i would share some thoughts:
– They are indeed light – i replicated your 20g for a 5+ inch diameter which i used with my billy’s, and for my toaks 650 a 4.5 inch diameter is only 16g – both 100mm high
– the hardest part of making them is getting the rivets to look neat in 0.1mm Ti for the most excellent monkey grip design(which works!!)
– You do need to add the weight of pot supports and any stakes to hold it in place in wind – that 12+9=21g extra – but even so this is a light and effective stove. i use stainless steel bike spokes (2mm diam) from an old bike for pot supports, cost was free, and they actually weigh less than common shepherds hook 6” Ti stakes (which are typically 3-3.25mm diamter and weigh 6-6.5g ea).
– the stove do smoke a bit even with thr fuel feeder port facing the wind and especially when the wood is wet – they can benefit from some additional air holes at ground level to increase airflow dynamics in the burn chamber, most definitely if there is a wind and you position these into it
– But in practice I prefer to step it up a bit – I find the 0.1mm Ti stove is very fiddly and you need to take great care when pushing the sticks in or using it. Ive now taken to using 0.2mm Ti or 0.1mm stainless steel – and cutting this in 4 separate panels that interlock (using a lixada interlocking design) rather than one long piece that is rolled – this way the panels lay flat for packing. I prefer this as it means i can make the stove taller than my pot, eg 120-140mm high for a 4.5 to 5” diameter stove, to greatly increase chimney effect. I need the panels to pakc flat as it wont now roll up and fit into my pots or billies. With the panel design change I also add air vents top and bottom and an elevated mesh floor which greatly increase burn chamber air flowmdynamics – I add holes around the very top and the very bottom as in your original flashing stove article, but also critically add an elevated light stainless steel mesh floor supported on stakes just above the bottom row of holes (a circle made from a kitchen flour sieve) . The resultant stove weighs a little bit more (but total stove in 0.2mm Ti with 4 spoke stakes and mesh floor is still well under 60g) and burns much better than the 100mm high 0.1mm roll stoves due to greater air flow(fuel burns much better and ergo boil times are much less, as is smoke with wetter wood), and the resultant 0.2mm Ti stove is more robust for fuel stoking and general handling.
But thankyou for inspiring all the testing and redesigns – my version fits my uses better, but yours is still quite simple and effective.
Hi Craig, You have been busy and I am sure everyone will appreciate your input. My next model will use a different closure (https://www.theultralighthiker.com/2022/04/05/ultralight-windscreen-or-chimney-closure/) which dispenses with the pop rivets. I have also been thinking about altering the air inlets etc. Using .2 mm foil would make it a bit tougher and I had already bought some with that in mind. I think it would still roll up. I have also thought about making the roll-up stove smaller than the pot so you don’t need the pegs but stability would be affected. I use 1 or 2 gram pegs to anchor it to the ground and to support the pot so this doesn’t add so much to the weight. I hope to offer these for sale soon. Cheers, Steve.