Modifying Amazon’s G4 Free. Inflation has bitten a little since I wrote the previous post (below) such that now this excellent backpack costs $US 22.99 at Amazon instead of the US$19.99 I paid back in March 2018. That’s inflation at 3.75% per year by the way. Still a lot cheaper than a plus $300 backpack which will do nothing more – or even do it half so well.
Since then I carried mine to (beyond) Dingboche on the Everest Base Camp trail – and many other places besides – though our travels have been somewhat curtailed recently like everyone else’s by covid, or at least its restrictions.
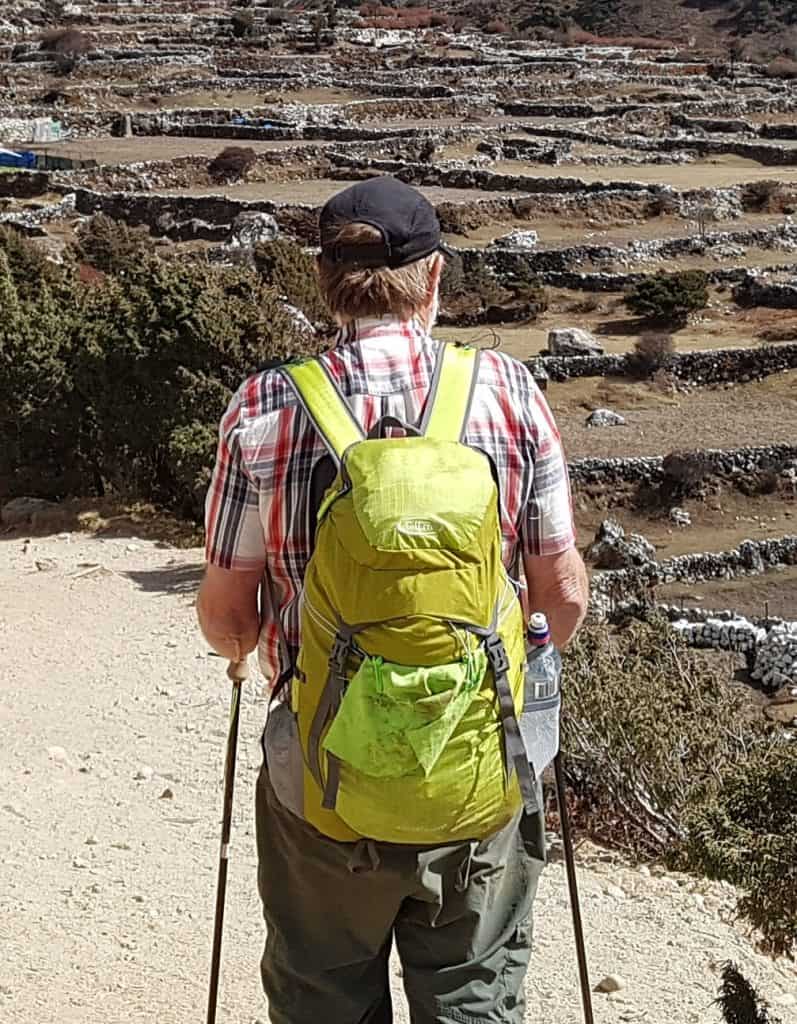
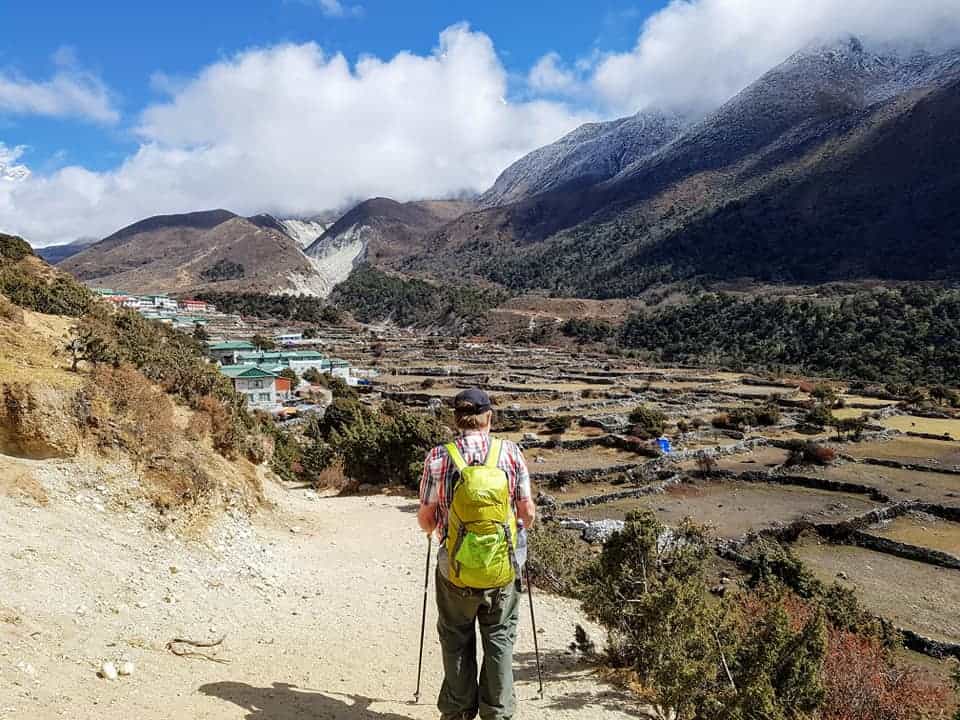
You can see in this post EBC Gear List me carrying mine just outside Pangboche over 5 km up in the sky. The backpack carried everything we needed for a ten day walking trip (including rain gear, spare clothes, survival, satellite communication (2) cooking, sleeping and shelter equipment (for -20C temperatures). It weighed a little over 6 kg. Della’s was nearer 5kg. Almost no food and minimal water. You can buy it on the way And was outstandingly comfortable.
I hardly noticed I was carrying it (at 70+ years old) though my worn out knee was ‘killing me’ back then – which is why I had it replaced last month. It had been causing me significant pain for nearly a decade now. This used to be called ‘manning up’ and was considered a virtue. See I Kneed You
‘All’ the young(er) folk – they were – on the trail had a day pack bigger than this, plus a porter (we were alone) carrying maybe a 100 kg of ‘essential’ gear (really) for them – despite which we noticed a number of them died, and many nearly did so! (Though we did what we could for them). ‘A word to the wise is enough’ is an old and valuable saying. (Dos and Don’ts on the EBC and Elsewhere) I have written millions of words in this blog, but they have not necessarily made people any wiser! You do have to take it in, not just skip through looking at the ‘pretty’ pictures. Paying attention may save your life.
Here in rural Victoria (where we live), we (ie Della and I) have been prevented from hiking/canoeing/camping out by ourselves for nearlytwo years even though we have lived together for over fifty years now and would have seen no-one else on our travels. Such restrictions as this were mindless and onerous at best.
Hopefully they are now over, and as soon as my new knee is all healed and functional again (now three weeks out from total knee replacement – and walking unaided – though slowly) we shall be off into the mountains once again. (Probably a canoe trip first if the warm weather holds up).
Since I wrote the post Budget Pack Mods I have had time to reflect on ways to modify this excellent pack and would now do some things differently. I am about to order 3-4 more of them so I can try out various things. They will make excellent gifts for like-minded people.
The things that make this pack so excellent (as I have tried to explain before are: That it is (roughly) triangular in shape in both directions – or tear-drop shaped and relatively short so it matches the body shape and length of the average man and more than half of women – much moreso than the ‘normal’ pack which is almost universally too long.
The pack carries the bulk of its weight at the bottom in its widest extent which swings comfortably into the small of one’s back where it sits most naturally with just a very slight tension on a waist belt to keep it there without exerting any pressure on the shoulders at all. I’m afraid you will have to spend the $20 to try it out so as to see that I am right, but after you do you will no doubt find that it is worth conducting the simple modifications I recommend here to make it even better.
You should read the post Backpack Tips and Tricks to understand why this is – particularly the quote from hiking icon Ray Jardine.
As you will see the G4 Free weighed 382 grams (out of the packet) for a 40 litre pack. Not bad. The Vidang Polo I compared it to (in that post) was 50 grams lighter (possibly a slightly lighter material) but doesn’t seem to be available any more. I wrote about an even lighter (and smaller) one in the post Superlight Hunting Pack 193 Grams (at $14 each!), but it may be too light for durability for extended use. It is worth trying out though, if only for the simple reason of seeing how low you can go.
You should read the (above) post through to see the sort of things you can cut off (and add on) to decrease the weight of either pack, then subsequently to increase its size and functionality. Of course you will have slightly different requirements to me, but this ‘Ultralight Hunting Pack’ ended up being 40-45 litres and weighed only 193 grams (with a waist belt) and as I say cost $14!
I could fit all my gear (and food) in that pack for a trip of 4-5 days (in sub-zero weather and unusual safety) but still end up carrying only 6-8 kg including food and water at the outset. So can you.
‘Ultralight’ is not a competition though. You should not compromise safety – though most people do. They often have no idea how to find their way, find water or construct a shelter either! One day, if they keep at it, they will end up dead if luck turns against them. In contrast in similar circumstances I would suffer a minor inconvenience – often one I enjoyed because I have long since mastered some essential skills. So should you.
Neither should you compromise comfort. It is great to be warm and dry – and to get a good night’s sleep as here: A Soft Pillow and a Warm bed Under the Stars. Nor do the things which provide such ‘luxuries’ have to weigh a ton/ne.
There are a number of unnecessary items you can strip and cut off the pack to reduce this weight (which I did), then I proceeded to add some features in. I wanted a waist band, not a hip belt -which is in the wrong place and only serves to trap the hips impeding freedom of movement. This added only 12 grams. I also wanted to increase the height of the side pockets which I did by adding 1/2″ straps above them. This also effectively increased their volume (by a couple of litres altogether – so that my tent fits ‘in’ one one one side and a one litre Platypus bottle ‘in’ the other).
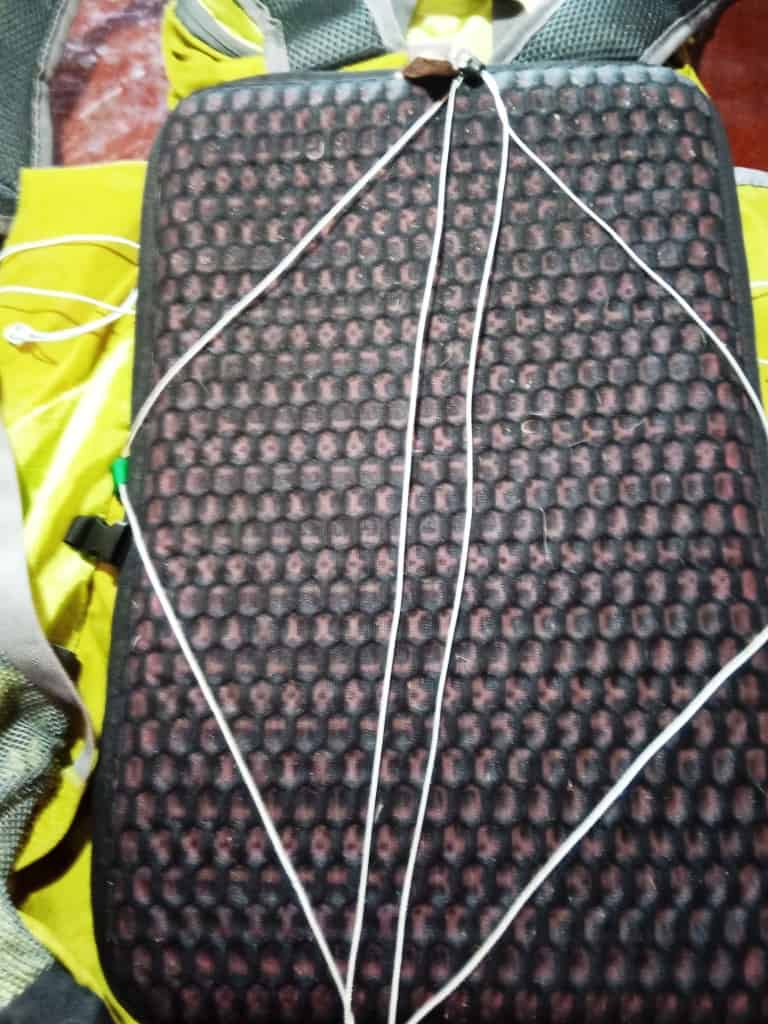
I also added the ability to attach a pad to the back of the pack. I would now instead sew some wicking material here to perform the same job (dry back). I think two (parallel) strips of three 3″ wide layers of this material ‘Spacer Mesh’ from Ripstopbytheroll will do nicely for this purpose. I will have to cut away an (unnecessary) internal pocket to sew them in (which will also save a little weight).
Instead of the pad holder (which worked) I would sew the wicking material above in its place saving approx 50 grams over all.
Also, I do not like zippers. Nothing is more likely to fail in the wilderness or to be as difficult to repair. I feel you should always carry a small quantity of nylon ripstop and a needle and thread so as to effect small repairs to your equipment on the trail.
If you are unable to perform such simple chores you should probably stay home – as one day you will die out there because of your lack of elementary survival skills which you should have learned in the first couple of years of primary school had not the ‘education’ system long since abandoned any such worthwhile goals.
Here is a useful (compendium) post about elementary survival skills which you should read and master before you go anywhere: The Compleat Survival Guide I am working on a more comprehensive update of this important post whilst I am laid up. Watch for it. As I say in my Intro “These days our combined age is 140+…I have camped out a lot, much more now than two years of my life in total. I have seen the failure of just about every type of gear, and experienced just about every disaster which can befall you in the wilderness, and survived.” Please do think on that.
There are three zips on this pack whereas none at all is the ideal in my opinion. The first two are in the ‘brain’ or lid. There are two storage areas in this lid which can be reached one from the inside and one from the outside. I would delete the one which accesses from the outside which if it fails will spill its contents all over the bush without your knowledge. I would probably just sew a piece of light material over it so it cannot be opened as it would be quite difficult to unpick and remove it.
You can see the three zips in these photos and also the extension collar and clothes line I added.
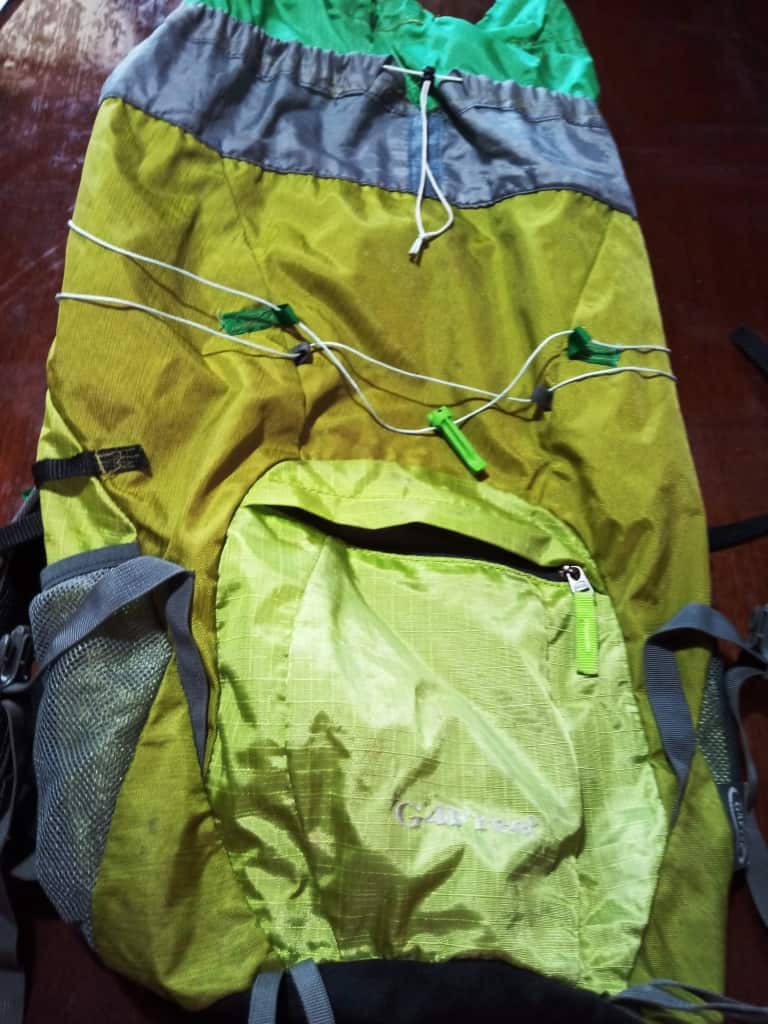
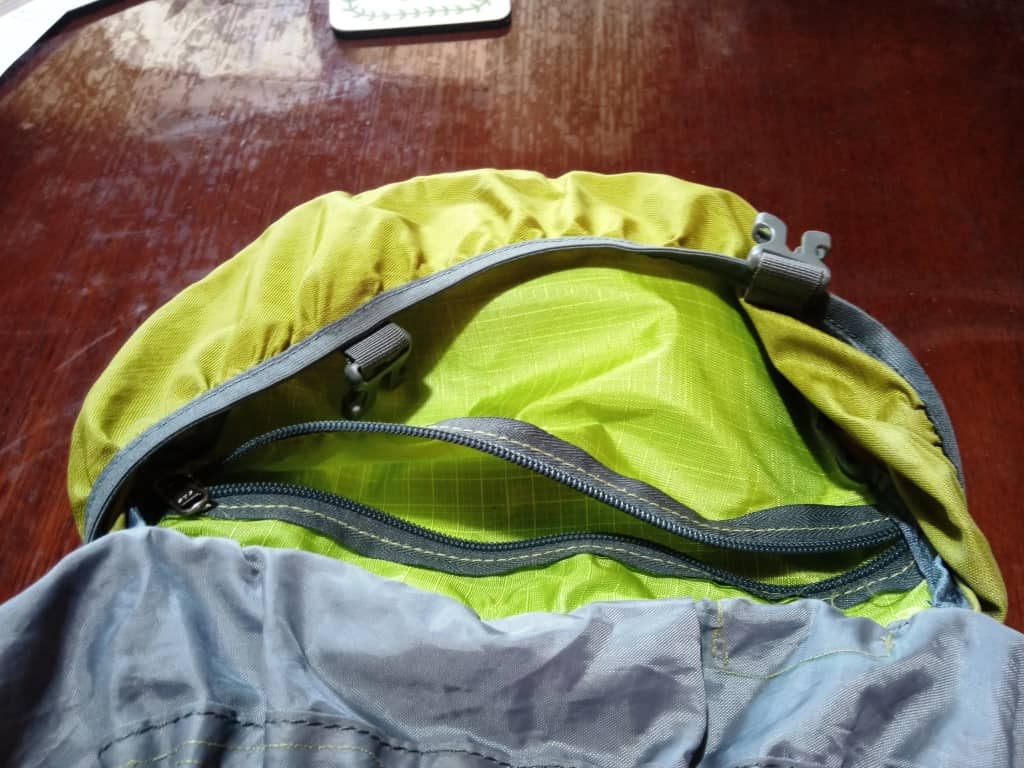
I would cut away the piece of material which separates the inside storage area on the lid from the outside making just one lager storage area. It probably doesn’t matter if you just leave the inside zip as if it fails the contents can’t go anywhere anyway except inside the pack. I suspect that opening this area up each to the other will have the effect of increasing the actual usable storage area of the pack anyway probably by a litre or so.
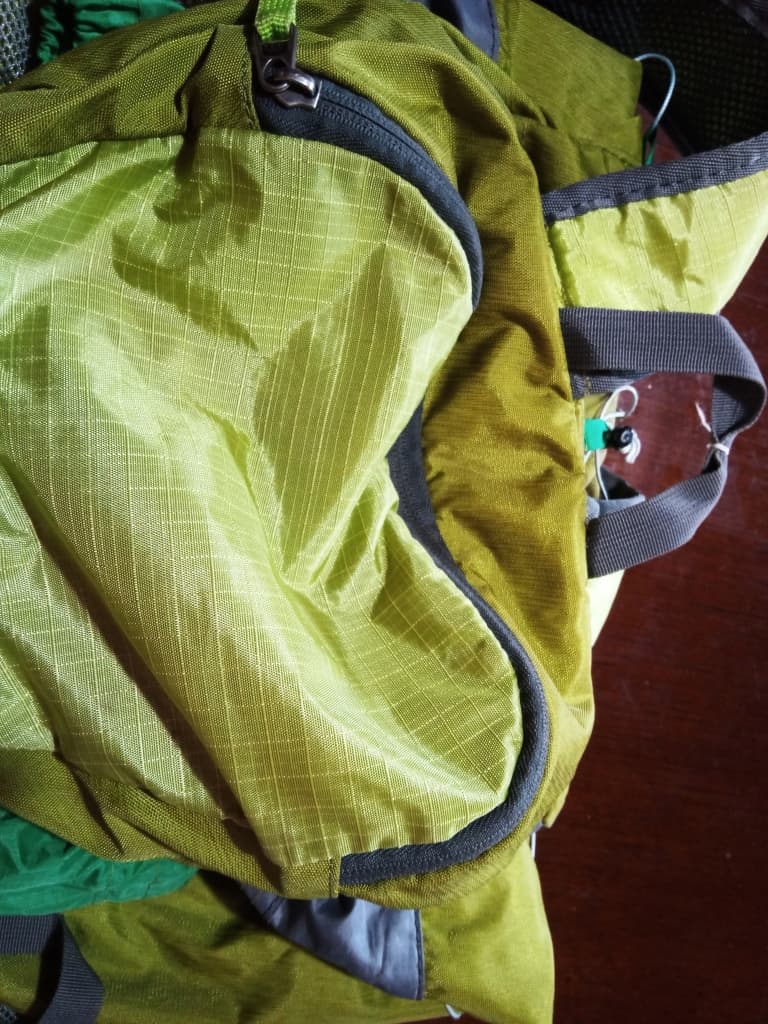
The other zip is on the back pocket which is a fraction too small for anything much anyway. This is practically my only criticism of this pack. Removing it is the challenge I am having most difficulty with. I am going to try cutting off the top flap (of the zipper) altogether, then sewing a piece of material top of the remaining the bottom then to the pack above it so as to extend that pocket all the way up to the pack closure where it can be closed with a piece of Velcro or with an elastic strap or etc.
This will require a small amount of hand sewing at the ends of the existing zip. It should get me a pocket big enough to store a couple of longer items (such as folded hiking poles or a machete) and should add maybe 3 litres to the volume of the pack so that I end up with around 52-4 litres altogether including the shoulder pouches – enough for quite a long journey really.
My (ideal) pack will also have a circle of small vertical pockets inside the main pack just below the draw string into which I can thrust things which I need now and then as I go along – such objects as gloves, phone, head torch, sunglasses…I may even add some to the G4 when I am sewing on the extension collar.
I am also not happy with mesh for the side pockets (as it catches on blackberries and tears) – but it is too much trouble to change it. When I make my own pack (soon) it will have solid material on all external pockets but it will have a similar overall shape to the G$ save that I will make the side pieces so that they better conform to the natural curves of the human anatomy which for some mysterious reason no pack that I know of does! That is they will cause the pack to bulge in or out at the appropriate spots so it actually ‘fits’ against you.
The pack straps may seem too thin at first glance. I thought their lack of padding would be a problem myself, but this is not so at all. Instead they are wonderfully comfortable and the wicking material prevents sweat build up. However when I make my own pack I think I will make the straps very wide indeed, probably over 3″. I may use the pattern for the original G4 pack’s straps which you can find here. I intend that (sometimes) I will carry significant weight (perhaps eg beginning a traverse of Tasmania’s West Coast, a 28 day unsupplied trip) as much as 20-25 kg, but reducing every day. If there is such a significant weight on the shoulders (as then) they will need to be well padded.
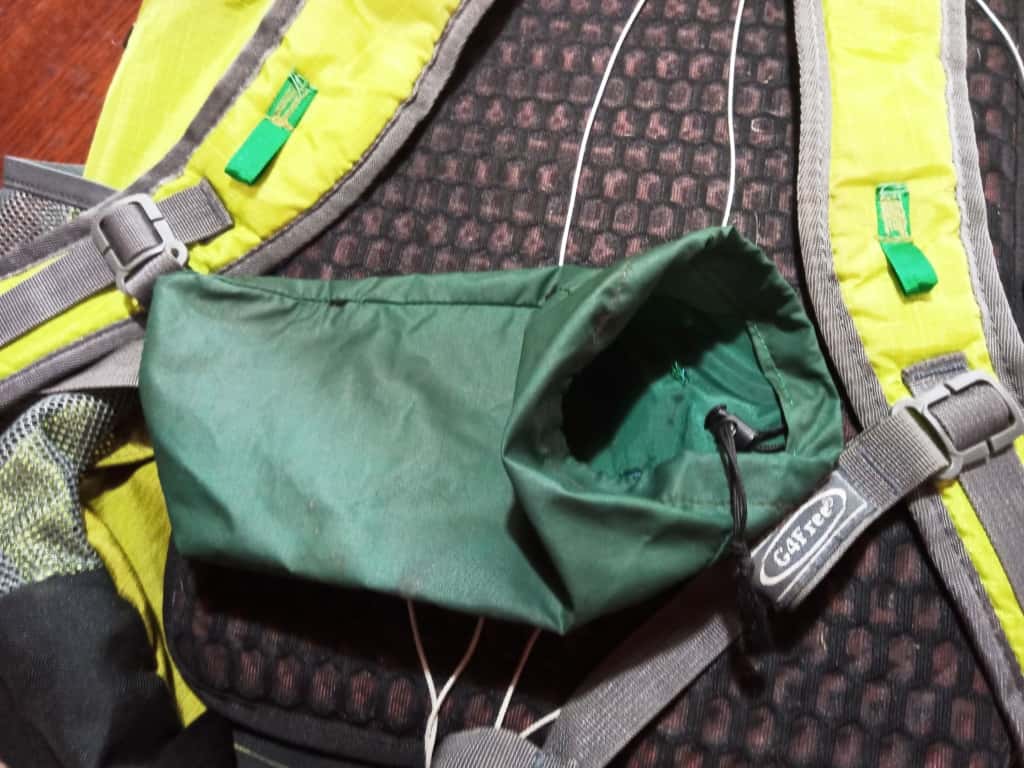
I sewed up a couple of shoulder strap pouches from some 2 oz/yd2 ripstop nylon for mine. I guess these are about 3/4 of a litre each, maybe a litre. I will do a separate post about them (soon) which I intended to do except I was off to Nepal at the time. Since then I forgot, but I found them on the pack today! They can contain an interesting assortment of items you might want to access quickly as you walk along. Spare ammunition, chewing gum etc.
I attached them with an ingenious method I ‘stole’ from Joe Valesko (Zpacks) though I have no idea whether he still uses them. They came on my first old pack from him – a long since discontinued model, worse luck. Simpler is frequently better – and certainly cheaper. Anyway it is a simple ‘button and loop’ design with a length of cord which works to stop them slipping down.
It is just a short length of cord with a micro cord lock which you can pass though the two (sewn) loops of gross grain ribbon then pass the cord lock back through its own loop (like a button hole). It stops the pouch slipping further down the strap. Obviously it is held on the strap by the sleeve which is first sewn to the pouch before you sew up the side seams. They are not attached at the moment.
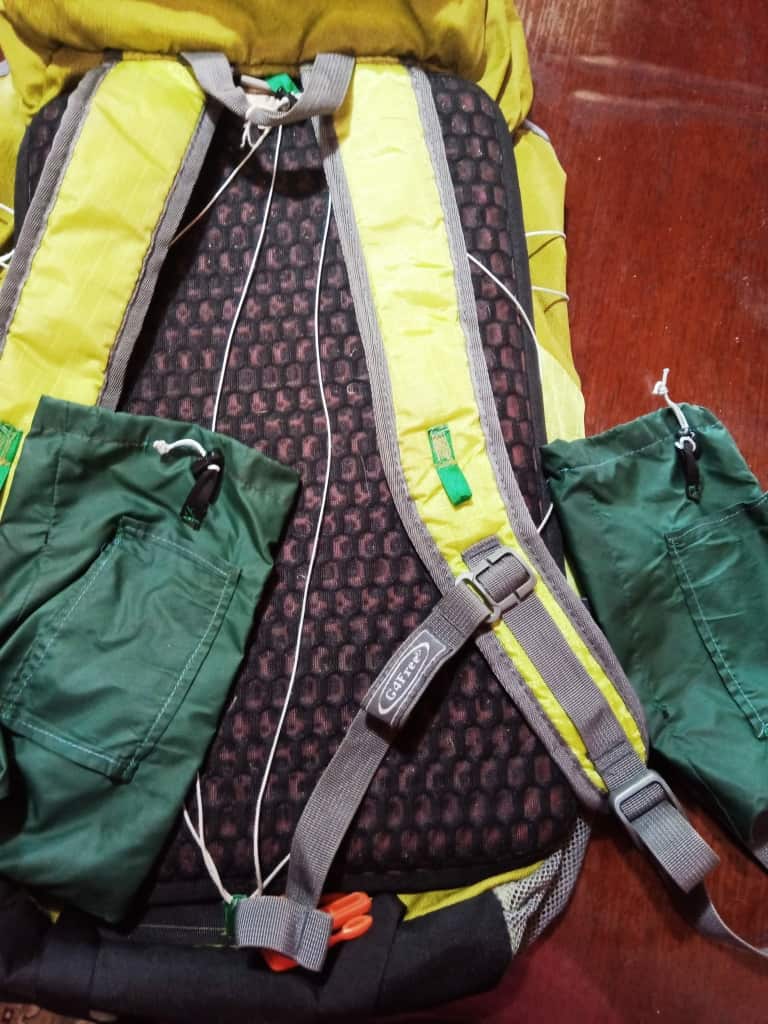
A simple draw string closure is all you need. These pouches weigh 8.5 grams each and measure approx 5.5 x 8.5″ (14 x 21 cm).
Instructions on how to make such stuff sacks/pouches can be found here: DIY Stuff Sacks
I hope you enjoy your modified G4 Free pack which I realise is going to cost you nearer $30 (and some work) so putting a lie to my title, but so it goes. You will be a better, more independent person from having ‘had a go’ at making something yourself. Next maybe you will try for a shelter as I mentioned in this post Zpacks Solo Tent (and others) and maybe a sleeping bag even (Instructions to follow). I am assuming you have already made some progress with your cooking equipment as in this post Mastery of Fire and Other DIY Projects. There are over 100 of them now!
Cheers, Steve.
PS: Until I looked at my cover photo I had forgotten I had added an Ultralight Mobile Clothes Line too. You can se it drying a (somewhat soiled) handkerchief as I walked along.
PPS: I am also going to try sewing a piece of the ‘Spacer Mesh’ to fill the triangle/crescent between the pack straps and my neck (cover photo). I believe this will ‘spread the load’ slightly from my shoulders.
Oh, the pack will weigh about 350 grams when you are finished.
NB: When you have completed these pack mods you will have a sub 400 gram approx 55 litre pack which is superbly comfortable for less than $30 (and the ability to repair it in the field). You should also note that all the seams on the G4 Free are double bound with bias binding, so they have four layers of material and at least two lines of stitching making them incredibly better built than pretty much every $500+ pack you could buy. Dearer isn’t always better (or lighter).
If you decide to move on to building your own (real original) G4 the instructions are here DIY Hiking Gear or you may decide to have a go at Ray Jardine’s excellent DIY Back pack kit, or you might decide to combine something of all three – as I am planning to do soon.
There are plenty of Cheap Tough (G4 style) Backpacks available out there such as this one for A$82.30). Most have hip belts which don’t suit stouter folks (ie most) and are too long. Don’t know about this one.
See Als0:
DIY Hiking Gear (eg making your own G4 Pack)
Hi Steve
Thanks for the great site. Yes Gippsland is awesome. I’m a few months from launching into a larapinta trail trip was wondering if the G4 Amazon pack would be suitable for this. I” m 188cm. Prior to coming across your site was going to spend a bit more then this awesome info.
I’ll be using a tarp, quilt and ground sheet to keep the weight down. But will need to carry 5-6 litres of water and food for 3 days.
cheers Kev
Thanks Kev, 7.5 kg in food and water may stretch it a bit. Suggest you try one out – it will work for other trips anyway. You can make them a bit bigger (as I have) and reinforce the suspension. There are larger (cheap) dyneema packs available on Aliexpress for less than $100 though. Cheers, Steve.